Compiling a program
First, getting a working compiler
Before you can compile Prog8 programs, you’ll have to download or build the compiler itself. Then make sure you have installed the Required additional tools. Then you can choose a few ways to get a compiler:
Download an official release version from Github:
download a recent “fat-jar” (called something like “prog8c-all.jar”) from the releases on Github
run the compiler with “java -jar prog8c.jar” to see how you can use it (use the correct name and version of the jar file you’ve downloaded).
Or, install via a Package Manager (takes care of dependencies for you):
- Arch Linux:
Currently, it’s available on AUR for Arch Linux and derivative systems. The package is called “prog8”. There should be no need to install anything else as it can automatically pull in the required dependencies.
This package, alongside the compiler itself, also globally installs syntax highlighting for
vimandnano. In order to run compiler, you can typeprog8c. The usage of those commands is exactly the same as with thejava -jarmethod.In case you prefer to install AUR packages in a traditional manner, make sure to install “tass64” package before installing prog8, as makepkg itself doesn’t fetch AUR dependencies.
- Mac OS (and Linux, and WSL2 on Windows):
Prog8 can be installed via Homebrew using the command
brew install prog8. It will make theprog8ccommand available and also installs the other required software tools for you. While Homebrew works on Linux, it’s probably best to first check your distribution’s native package manager.
Or, download a bleeding edge development version from Github:
find the latest CI build on the actions page on Github
download the zipped jar artifact from that build, and unzip it.
run the compiler with “java -jar prog8c.jar” (use the correct name and version of the jar file you’ve downloaded).
Or, use the Gradle build system to build it yourself from source:
The Gradle build system is used to build the compiler. You will also need at least Java version 17 or higher to build it.
The most interesting gradle commands to run are probably the ones listed below.
(Note: if you have a recent gradle installed on your system already, you can probably replace the ./gradlew wrapper commands with just the regular gradle command.)
./gradlew buildBuilds the compiler code and runs all available checks and unit-tests. Also automatically runs the installDist and installShadowDist tasks. Read below at those tasks for where the resulting compiler jar file gets written.
./gradlew installDistBuilds the compiler and installs it with scripts to run it, in the directory
./compiler/build/install/prog8c./gradlew installShadowDistCreates a ‘fat-jar’ that contains the compiler and all dependencies, in a single executable .jar file, and includes few start scripts to run it. The output can be found in
./compiler/build/install/prog8c-shadow/./gradlew shadowDistZipCreates a zipfile with the above in it, for easy distribution. This file can be found in
./compiler/build/distributions/
For normal use, the installDist task should suffice and after successful completion, you can start the compiler with:
./compiler/build/install/prog8c/bin/prog8c <options> <sourcefile>
(You should probably make an alias or link…)
Hint
Development and testing is done on Linux using the IntelliJ IDEA IDE, but the actual prog8 compiler should run on all operating systems that provide a Java runtime (version 17 or newer). If you do have trouble building or running the compiler on your operating system, please let me know!
To successfully build and debug in IDEA, you have to do two things manually first:
you have to generate the buildversion file, do this with the shell command:
gradle createVersionFilemanually generate the Antlr-parser classes first.
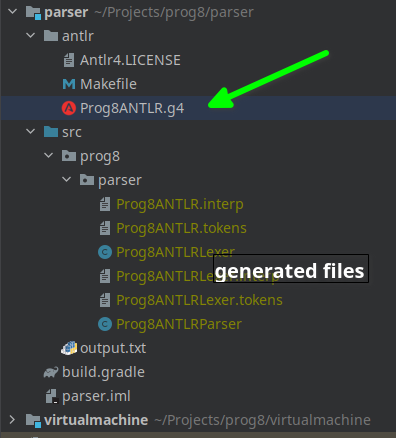
The easiest way to build the parser classes this is the following:
make sure you have the Antlr4 plugin installed in IDEA
right click the grammar file Prog8ANTLR.g4 in the parser project, and choose “Generate Antlr Recognizer” from the menu.
rebuild the full project.
Alternatively you can also use the Makefile in the antlr directory to generate the parser, but for development the Antlr4 plugin provides several extremely handy features so you’ll probably want to have it installed anyway.
Required additional tools
64tass - cross assembler. Install this program somewhere on your shell’s search path. It’s easy to compile yourself, but a recent precompiled .exe (only for Windows) can be obtained from the files section in the official project on sourceforge. You need at least version 1.58.0 of this assembler. If you are on Linux, there’s probably a “64tass” package in the repositories, but check if it is a recent enough version.
A Java runtime (jre or jdk), version 17 or newer is required to run the prog8 compiler itself. If you’re scared of Oracle’s licensing terms, get one of the versions of another vendor. Even Microsoft provides their own version. Other OpenJDK builds can be found at Adoptium . For MacOS you can also use the Homebrew system to install a recent version of OpenJDK.
Running the compiler
You run the Prog8 compiler on a main source code module file. Other modules that this code needs will be loaded and processed via imports from within that file. The compiler will link everything together into one output program at the end.
If you start the compiler without arguments, it will print a short usage text. For normal use the compiler can be invoked with the command:
$ java -jar prog8c.jar -target cx16 sourcefile.p8(Use the appropriate name and version of the jar file downloaded from one of the Git releases. Other ways to invoke the compiler are also available: see the introduction page about how to build and run the compiler yourself. The
-targetoption is always required, in this case we tell it to compile a program for the Commander X16)
By default, assembly code is generated and written to sourcefile.asm.
It is then (automatically) fed to the 64tass assembler tool
that creates the final runnable program.
Command line options
- One or more .p8 module files
Specify the main module file(s) to compile. Every file specified is a separate program.
-help,-hPrints short command line usage information.
-asmlistAlso generate an assembler listing file <program>.list
-breakinstr <instruction>Also output the specified CPU instruction for a
%breakpoint, as well as the entry in the vice monitor list file. This can be useful on emulators/systems that don’t parse the breakpoint information in the list file, such as the X16Emu emulator for the Commander X16. Useful instructions to consider arebrkandstp. For example for the Commander X16 emulator,stpis useful because it can actually trigger a breakpoint halt in the debugger when this is enabled by running the emulator with -debug.-bytes2float <bytes>convert a comma separated list of bytes from the specified target system to a float value. Also see -float2bytes
-checkQuickly check the program for errors. No actual compilation will be performed.
-compareir <baseline.p8ir>Compare the generated IR file with a baseline IR file. Shows a summary of differences including instruction count, chunk count, register usage, and file size. Also displays the first 10 instruction differences to help identify what changed. Useful for comparing optimized vs non-optimized builds, or tracking changes between compiler versions.
-D SYMBOLNAME=VALUEAdd this user-defined symbol directly to the beginning of the generated assembly file. Can be repeated to define multiple symbols.
-daemonUse the prog8c compilation daemon (auto-starts it if not running). This keeps the compiler running as a background server process, which greatly speeds up subsequent compilations by eliminating JVM startup overhead and allowing reuse of cached data. The daemon listens on a Unix domain socket and automatically shuts down after a period of inactivity. Unlike
-watch, the daemon does not monitor files for changes: you still invokeprog8c -daemoneach time you want to compile. The speedup comes from the warm JVM, not from automatic recompilation. Because each invocation is an individual compiler run, you can compile different source files or pass different options on each call — the daemon does not lock you into a single project or set of flags.-dumpsymbolsprint a dump of the variable declarations and subroutine signatures
-dumpvarsprint a dump of the variables in the program
-emu,-emu2Auto-starts target system emulator after successful compilation. emu2 starts the alternative emulator if available. The compiled program and the symbol and breakpoint lists (for the machine code monitor) are immediately loaded into the emulator (if it supports them)
-expericodegenUse experimental code generation backend (incomplete).
-float2bytes <number>convert floating point number to a list of bytes for the specified target system. Also see -bytes2float
-ignorefootgunsDon’t print warnings for ‘footgun’ issues. Footgun issues are certain things you can do in Prog8 that may make your program blow up unexpectedly, for instance uncareful use of dirty variables, or reusing the R0-R15 registers for subroutine parameters. With this option you’re basically saying: “Yes, I know I am treading on mighty thin ice here, but I don’t want to be reminded about that”.
-libsearch patternSearch in the embedded library files for occurrences of the given regex pattern. If no exact matches are found, the compiler automatically attempts a “fuzzy” search by inserting wildcards between the characters of the search pattern.
-libdump pathExtract all embedded library files into the given output directory. Note: the library source code belongs to the Prog8 project and is licensed under the GPL 3.0 software license.
-noasmDo not create assembly code and output program. Useful for debugging or doing quick syntax checks.
-nooptDon’t perform any code optimizations. Useful for debugging or faster compilation cycles.
-out <directory>Sets directory location for output files instead of current directory. Creates it if it doesn’t exist yet.
-plaintextPrints output messages in plain text: no colors or fancy symbols.
-printast1Prints the “compiler AST” (the internal representation of the program) after all processing steps.
-printast2Prints the “simplified AST” which is the reduced representation of the program. This is what is used in the code generators, to generate the executable code from.
-quietDon’t print compiler and assembler messages.
-quietasmDon’t print assembler messages
-slabsgoldenput memory() slabs in ‘golden ram’ memory area instead of at the end of the program. On the cx16 target this is $0400-07ff. This is unavailable on other systems.
-slabshighput memory() slabs in high memory area instead of at the end of the program. On the cx16 target the value specifies the HIRAM bank to use, on other systems this value is ignored.
-nosourcelinesDo not include the original prog8 source code lines as comments in the generated assembly code file, mixed in between the actual generated assembly code. The default behavior is to include the source lines.
-srcdirs <pathlist>Specify a list of extra paths (separated with the system path separator, ‘:’ on Linux/macOS, ‘;’ on Windows), to search in for imported modules. These directories are prepended to the module search path, meaning they have the highest priority and will be searched before the neighboring directory, the current directory, and the standard library. Useful if you have library modules somewhere that you want to re-use, or to switch implementations of certain routines (performing a “complete overlay”) via a command line switch.
-target <compilation target>Sets the target output of the compiler. This option is required.
c64= Commodore 64,c128= Commodore 128,cx16= Commander X16,pet32- Commodore PET model 4032,virtual= builtin virtual machine. You can also specify a file name as target, prog8 will then try to read the target machine’s configuration and properties from that configuration file instead of using one of the built-in targets. See Customizable targets for details about this.-timingsShow a more detailed breakdown of the time taken in various compiler phases, for performance analysis of the compiler itself.
-varsgoldenLike
-varshigh, but places the variables in the “golden ram” area instead (e.g. $0400-$07FF on CX16, $1300-$1BDF on C128). Because this is in normal system memory, there are no bank switching issues. This mode is only available on the Commander X16 and the Commodore 128, and possibly on custom configured targets.-varshigh <rambank>Places uninitialized non-zeropage variables in a separate memory area, instead of inside the program itself. This increases the amount of system ram available for program code. The size of the increase depends on the program but can be several hundreds of bytes or more. The location of the memory area for these variables depends on the compilation target machine:
c64: $C000 - $CFFF ; 4 kB, and the specified rambank number is ignored
cx16: $A000 - $BFFF ; 8 kB in the specified HIRAM bank (note: no auto bank switching is done, you must make sure yourself that this HIRAM bank is active when accessing these variables!)
If you use this option, you can no longer use the part of the above memory area that is allotted to the variables, for your own purposes. The output of the 64tass assembler step at the end of compilation shows precise details of where and how much memory is used by the variables (it’s called ‘BSS’ section or Gap at the address mentioned above). Assembling the program will fail if there are too many variables to fit in a single high ram bank.
-versionJust print the compiler version and copyright message, and exit.
-vmload and run a ‘p8ir’ intermediate representation file in the internal VirtualMachine instead of compiling a prog8 program file.
-vmtraceEnable instruction-by-instruction tracing when running the virtual machine (use with
-vmor-emuon the virtual target). Prints each executed IR instruction with its location (chunk name and instruction index). Useful for debugging program behavior and understanding control flow in the IR code.-traceimportsPrints a detailed trace of every module that the compiler is importing and loading. It shows if the module is loaded from a file or from an internal resource, the exact path, and which import caused the module to be loaded. It also shows the search location type (current directory, neighboring directory, configured in
-srcdirs, etc).-warnimplicitcastsGive warnings for lines where a silent (implicit) type cast is done from a smaller to a larger type. Example: when a byte is assigned to a word variable. This may indicate a potential value evaluation issue because unlike most other programming languages, Prog8 doesn’t do automatic type enlargement for expressions. This means that for example if a=50 and b=20, a times b is not equal to 1000 if a and b are bytes. Only if one or both of them are explicitly casted to a word type, the calculation will result in the word value 1000. If you have code like this: uword result = a * b the compiler silently converted the byte result to a word variable, but maybe you expected the result to actually be 1000 here (and forgot to add a cast in the expression to make it words)
-warnshadowTells the assembler to issue warning messages about symbol shadowing. These can be problematic, but usually aren’t because prog8 has different scoping rules than the assembler has. You may want to watch out for shadowing of builtin names though. Especially ‘a’, ‘x’ and ‘y’ as those are the cpu register names and if you shadow those, the assembler might interpret certain instructions differently and produce unexpected opcodes (like LDA X getting turned into TXA, or not, depending on the symbol ‘x’ being defined in your own assembly code or not)
-watchEnables continuous compilation mode (watches for file changes). This greatly increases compilation speed on subsequent runs: almost instant compilation times (less than a second) can be achieved in this mode. The compiler will compile your program and then instead of exiting, it waits for any changes in the module source files. As soon as a change happens, the program gets compiled again. Note that it is possible to use the watch mode with multiple modules as well, but it will recompile everything in that list even if only one of the files got updated. Combined with the Emulator’s Host-FS or real hardware Calypso’s network drive: this enables you to edit prog8 source files with an editor on the X16 itself (such as XVI, XEdit). When saving the source file, the compiler can sit in the background in watch mode, and recompile it for you immediately on save. Then you can directly run the new resulting PRG file in the X16! Unlike
-daemon, the watch mode keeps the process in the foreground and automatically recompiles on file changes, whereas-daemonis a background server that you invoke explicitly each time you want to compile.
Module source code files
A module source file is a text file with the .p8 suffix, containing the program’s source code.
It consists of compilation options and other directives, imports of other modules,
and source code for one or more code blocks.
Prog8 has various LIBRARY modules that are defined in special internal files provided by the compiler. They are embedded into the compiler so you don’t have to worry about where they are, but their names are generally reserved for the standard library (although you can override them if necessary, see below).
Importing other source files and specifying search location(s)
You can create multiple source files yourself to modularize your programs. You can also create “library” modules with handy routines that can be shared among programs. By importing those module files, you can use them in other modules.
When the compiler encounters an %import mymodule directive, it searches for a file named
mymodule.p8 in the following locations (in this exact order):
User Source Directories: Any directories specified with the
-srcdirscommand-line option, in the order they were provided.Neighboring Directory: The folder containing the source file that contains the
%importdirective.Current Working Directory: The directory where the compiler was started from (
.).Target Library Directories: Target-specific library paths on the filesystem (only used by some targets or custom target configurations).
Internal Standard Library: Built-in modules bundled with the compiler (embedded as internal resources).
This search order allows you to override standard library modules or neighbor modules
by placing a version with the same name in a higher priority location.
This can also be used as a “lo-fi” way to provide different source files for different
compilation targets, which is useful because the compiler currently lacks conditional
compilation like #ifdef/#endif in C.
Debugging (with VICE or Box16)
There’s support for using the monitor and debugging capabilities of the rather excellent VICE emulator.
The %breakpoint directive (see Directives) in the source code instructs the compiler to put
a breakpoint at that position. Some systems use a BRK instruction for this, but
this will usually halt the machine altogether instead of just suspending execution.
Prog8 issues a NOP instruction instead and creates a ‘virtual’ breakpoint at this position.
All breakpoints are then written to a file called “programname.vice-mon-list”,
which is meant to be used by the VICE and Box16 emulators.
It contains a series of commands for VICE’s monitor, including source labels and the breakpoint settings.
If you use the emulator autostart feature of the compiler, it will take care of this for you.
If you launch VICE manually, you’ll have to use a command line option to load this file:
$ x64 -moncommands programname.vice-mon-list
VICE will then use the label names in memory disassembly, and will activate any breakpoints as well. If your running program hits one of the breakpoints, VICE will halt execution and drop you into the monitor.
Box16 is the alternative emulator for the Commander X16 and it also includes debugging facilities that support these symbol and breakpoint lists.
Troubleshooting
Compilation errors or warnings
When there are warnings or errors during compilation of your program, no output files will be produced, and the error messages will be printed on the screen like this:
ERROR file:///home/user/code/test.p8:13:9: undefined symbol: zzz
The severity is followed by the file and location in that source file where the error occurred (editors and IDEs that show the compiler output usually make these links clickable). The two numbers are the line number and column in the file. There are a couple of message severities:
- INFO
informational messages that can be ignored if you want
- WARNING
things that may be a problem depending on circumstances. If there are no errors, a compiled program is still produced, but it is a good idea to investigate the warnings that are printed.
- ERROR
unrecoverable problem that prevented successful compilation
Compiler doesn’t run, complains about “UnsupportedClassVersionError”
You need to install and use JDK version 17 or newer to run the prog8 compiler. Check this with “java -version”. See Required additional tools.
The computer resets after running my program
In the default compiler configuration, it is not safely possible to return back to the BASIC prompt when
your program exits. The only reliable thing to do is to reboot the system.
This is due to the fact that in this mode, prog8 will overwrite important BASIC and Kernal variables in zero page memory.
To avoid the reset from happening, use an empty repeat loop at the end of your program to keep it from exiting.
Alternatively, if you want your program to exit cleanly back to the BASIC prompt,
you have to use %zeropage basicsafe, see Directives.
The reason this is not the default is that it is very beneficial to have more zeropage space available to the program,
and programs that have to return cleanly to the BASIC prompt are considered to be the exception.
Odd text and screen colors at start
Prog8 will reset the screen mode and colors to a uniform well-known state. If you don’t like the
default text and screen colors, you can simply change them yourself to whatever you want at the
start of your program. It depends on the computer system how you do this but there are some
routines in the textio module to help you with this.
Alternatively you can choose to disable this re-initialization altogether
using %option no_sysinit, see Directives.
Floats error
Are you getting an assembler error about undefined symbols such as not defined 'floats'?
This happens when your program uses floating point values, and you forgot to import floats library.
If you use floating points, the compiler needs routines from that library.
Fix it by adding an %import floats.
Gradle error when building the compiler yourself
If you get a gradle build error containing the line “No matching toolchains found for requested specification” or “Gradle requires JVM 17 or later to run”, it means that the Gradle build tool can’t locate the correct version of the JDK to use. You will need a Java JDK version 17 or higher to build and run the compiler.
Strange assembler errors
If the compilation of your program fails in the assembly step, please check that you have the required version of the 64tass assembler installed. See Required additional tools. Also make sure that inside hand-written inlined assembly, you don’t use symbols named just a single letter (especially ‘a’, ‘x’ and ‘y’). Sometimes these are interpreted as the CPU register of that name. To avoid such confusions, always use 2 or more letters for symbols in your assembly code.
‘shadowing’ warnings from the assembler
Avoid using ‘a’, ‘x’ or ‘y’ as symbols in your inlined assembly code. Also avoid using 64tass’ built-in function or type names as symbols in your inlined assembly code. The 64tass manual contains a list of those.
Program loads but crashes immediately on startup
Assuming there are no programming errors in the code and the compiler has no code generation bugs, there can be various factors that cause this:
you are using
%option no_sysinitbut the program might depend on proper initialization of the system before it can run. Try removing this directive to see if it helps.the
mainblock is too large for default system RAM, causing the vital program startup routines that Prog8 requires to move outside of the default RAM area, making them inaccessible. For example on the C128 this can occur quite quickly because in the default memory configuration, the BASIC ROM already appears at $4000, leaving very little space for your program code by default. Prog8 attempts to reconfigure the memory but it can’t because the routine doing that is not accessible anymore and the program will jump to random code, crashing the system. Make sure the startup logic appears “soon enough” in your program - if in doubt, check the generated assembly file listing to see how large themainblock is and where the startup routines are placed. If this is in fact the problem, you need to modularize the code and move stuff out of themainblock and into their own block(s).
Examples
A bunch of example programs can be found in the https://github.com/irmen/prog8/tree/51257e47da213b7d0c985b6bf525aff254ece3d9/examples directory of the source tree on Github. (Or download the source archive from there to get all the files at once).
There are cross-platform examples that can be compiled for various systems unaltered, and there are also examples specific to certain computers (C64, X16, etcetera). So for instance, to compile and run the Commodore 64 rasterbars example program, use this command:
$ java -jar prog8c.jar -target c64 -emu examples/c64/rasterbars.p8
or:
$ /path/to/prog8c -target c64 -emu examples/c64/rasterbars.p8